Are you ready to build your WordPress website? Follow this guide to learn how.
I’ll show you how to build a WordPress site starting directly after a fresh installation. If you haven’t installed WordPress yet, follow my article on “how to start a blog“.
In this guide I’ll go step by step over the components of the admin dashboard including pages, posts, plugins and themes, to name a few, and describe what each of them do. Use the admin dashboard to build and manage your WordPress blog. Not every part of the dashboard is needed right away. I’ve written this guide in the order I suggest you build your blog.
For example, the first thing to do after a fresh WordPress install is to modify the Settings tab with your preferred timezone and date format among other relevant settings. Doing so is not intuitive from the WordPress admin dashboard considering the Settings tab is listed last in the sidebar.
Let’s get started building your blog!
How To Build A WordPress Blog
If you haven’t installed your WordPress blog yet, follow my article on “how to start a blog“. This guide picks up directly following a fresh WordPress installation.
Below I’ve described in short detail each of the sections in the admin dashboard. When starting a new blog you don’t have to update every single section. Therefore, to make it easier, I’ve included an ordered list of steps that I recommend you use to build your WordPress blog. The steps link to the corresponding sections below in this guide.
Follow this list of steps to feel confident that you’re building your WordPress site the right way. For a really quick refresher on the steps to take, just pay attention to the bold text in the guide.
Ordered List of Steps to Build Your WordPress Blog
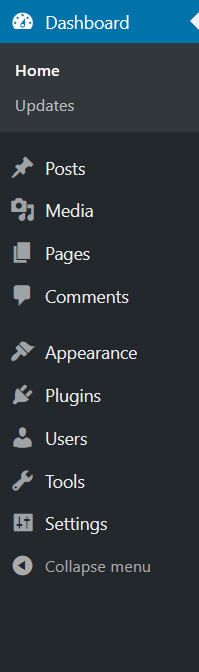
- Access the WordPress admin dashboard
- Edit Settings
- General Settings
- Writing Settings
- Reading Settings (discourage search engines for now)
- Discussion Settings
- Permalink Settings
- Edit Appearance
- Create Important Pages (About, Contact, Privacy, Terms)
- Update Widgets, Navigation Menu and Privacy Settings to Point to Pages
- Add Plugins (see my list of top 10 essential WordPress plugins
- Start Creating Posts
- Edit Reading Settings (uncheck to allow search engines to discover your site)
Accessing the WordPress admin dashboard
Before making any adjustments to your WordPress website you need to gain access to the administrative dashboard. To do so, simply browse to your domain name followed by /wp-admin
For example, the admin dashboard for TrailSix.com is located at:
https://www.trailsix.com/wp-admin

Login with the administrative credentials you created during the installation process. You will be redirected to the Dashboard’s Home page, which gives you a quick summary of your blog.
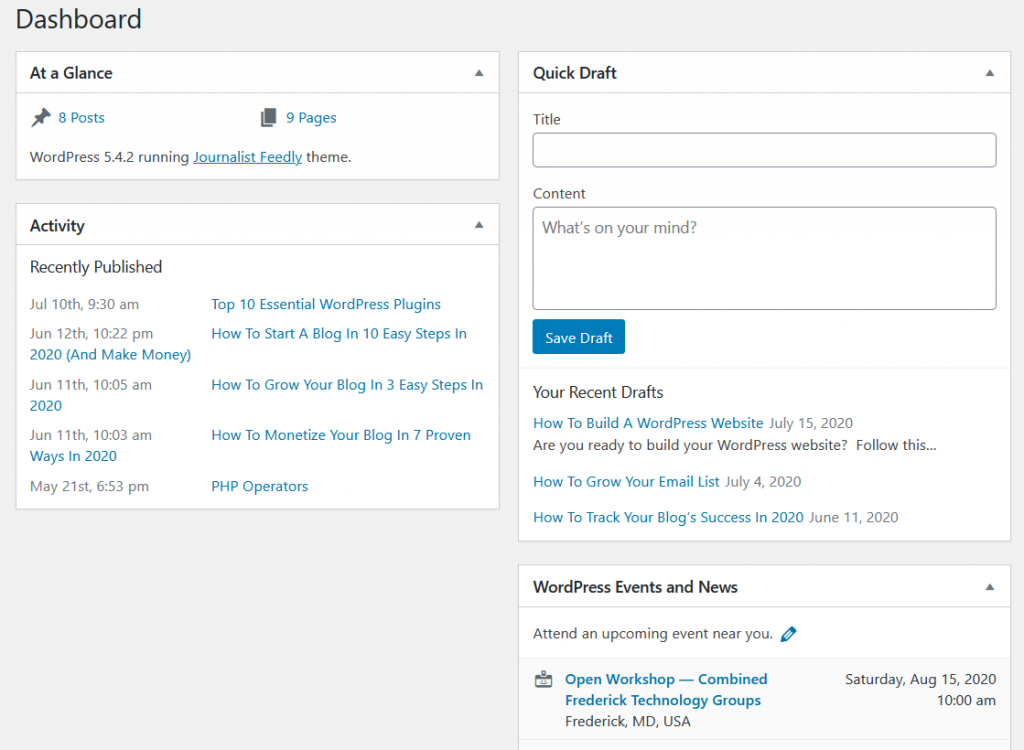
The “At A Glance” box tells you the number of posts and pages created and your WordPress version and theme.
The “Activity” box will display the most recently published posts.
The “Quick Draft” box lets you very quickly create a draft of a new post with just the title and post content. This is to capture your ideas without yet publishing them. Edit and publish your drafts later by visiting the Posts tab.
The “WordPress Events and News” box displays meetups, Wordcamps and the latest news from WordPress.org.
As you install plugins, which will be covered later in this guide, you’ll see more boxes being displayed on the dashboard home page. Plugin developers show these boxes to provide a quick status update concerning their plugins’ area of responsibility. Most often they’ll have links directed to the plugin within your admin dashboard for further management of the plugin.
Screen Options
At the top of your browser window you’ll see a tab named “Screen Options”. Select the checkboxes to show different boxes on that particular admin dashboard page. The options change based on the current page you’re viewing.

Settings
The first place to go after installing WordPress and logging in is the Settings menu. The Settings menu is a generalized menu controlling site-wide attributes.

General Settings
Most of this information was set during the installation of WordPress. Update your timezone, date format and time format if necessary. This format will be displayed beside posts and comments.
The New User Default Role is set to Subscriber by default. No changes are necessary. Read more about roles and capabilities. The Subscriber role lets a user read your blog posts without any additional capabilities like being able to create or edit posts or pages. Not to worry, non-logged in users can read your posts too. The Subscriber role differentiates logged-in from non-logged in users in case you wanted to restrict pages or posts to only logged in users. To do that is more involved and it’s not how WordPress functions by default so I won’t cover it here. When you’re happy with your changes select Save Changes.
Writing Settings
Default Post Category
Every post you write gets assigned to a category. I’ll discuss WordPress categories in more detail later in the Posts section. When starting out, the only category that exists is “Uncategorized”. No changes are necessary. As you create new Categories they will be displayed in the dropdown box beside Default Post Category. If you don’t manually change the category when editing a post then it will by default get set to the value that is in this dropdown list at the time the post is created.
Default Post Format
Read more about the different Post formats on WordPress.org. The theme of your site uses the post format selected to display post content differently. For example, an Aside post will be formatted similar to a Facebook note update while a Status post will be formatted similar to a Twitter status update.
Standard is used to designate that no Post Format has been specified. By default the Post Format is set to Standard. Unless you really want all of your posts to be a different format, I recommend leaving the Default Post Format set to Standard and changing the format when editing individual posts.
No other changes need to be made to the Writing Settings. Save and continue.
Reading Settings
Your Homepage Displays
“Your Homepage Displays” provides the option to display your latest blog posts on your home page or to display a static page on your homepage. WordPress will automatically display your latest blog posts on your homepage when you select the radio button for “Your latest posts”.
In contrast, when selecting the static page radio button, you will need to first create two Pages. One will be created with the content you would like to be displayed on the home page of your site. Make the title of this page “Home”. The other is a blank page that you create and save with the title “Blog”.
After creating those pages, select “Home” as your homepage and “Blog” as your Blog page.
Set how many blog posts to display per page beside “Blog pages show at most”. Do the same for syndication feeds. The default values of 10 don’t need to be changed.
Next, select whether you want to display the full text of an article or just the first paragraph. This setting applies to your posts page, search results and any other page where a listing (feed) of blog posts is returned.
Last, but very important, is Search Engine Visibility. Check this box as you initially create your site. Once you’ve finished this guide and you have created a few blog posts then it’s time to uncheck this box. The unchecked Search Engine Visibility box tells search engine crawlers to view your content and start indexing it. You’ll want to more proactively tell search engines about your site with a sitemap and by manually submitting your site to search engines. Those topics are beyond the scope of this guide.
Save your changes.
Discussion Settings
Default Post Settings
Default Post Settings are meant for communication with other WordPress blogs.
When you include a hyperlink to another blog within your post, your WordPress blog will send a comment to the remote WordPress blog if the box is checked to Attempt to notify any blogs linked to from the post.
When another WordPress site includes a link to your blog on their site, you will receive a comment on your post if you have the box checked to Allow link notifications from other blogs (pingbacks and trackbacks) on new posts.
Think of pingbacks as the comments between WordPress blogs. Think of trackbacks as the comments to or from a legacy blogging platform.
Next, decide whether you want people to be able to submit comments by default on your posts.
Any of these settings can be overridden for individual posts.
Other Comment Settings
On my blogs, Users must be registered and logged in to comment. That’s the only box checked under the Other comment settings section.
Everything else under the discussion settings is straightforward. Adjust as you see fit. This image is how TrailSix is configured.
 Leave blank the boxes for Comment Moderation and Comment Blocklist. You might need them as your blog starts receiving more comments, but it’s rare.
Avatars
This can be left as the default unless you would like to change it based on personal preference. This setting controls the avatars for people who comment on your site.
![]()
Media
These settings define the maximum sizes of thumbnails, medium and large images when uploaded to the Media Library. The Media Library is a separate sidebar menu item we’ll discuss later.
By default, all images will be uploaded into folders based on month and year.
There’s no need to change the defaults of the media settings.
Permalinks
Permalinks are the urls, aka web addresses, used to get to your posts and pages. When you create a new post or page, WordPress uses the permalink setting in this menu to create a url.

By default, WordPress will use the Plain setting for Permalinks. This url simply gets the id number of the post and links to it in the url. The Plain Permalink setting is very SEO unfriendly!
Select any of the common permalink settings or create your own custom structure using the Available tags. The majority of articles on TrailSix.com are evergreen content, which means they will be relevant for a very long time and not age off. This is why it’s not important for me to include the date in the url. If you’re creating a news site where the date is important, you might select a permalink option that includes the date in the url.
There’s no need to enter anything for Category base or Tag base.
Privacy
Most likely you’re required by national or international law to create a privacy policy page and make it available on your website. Point to your privacy policy page using the dropdown selection box. There are many plugins that can help you create pages for privacy policies, terms of use, etc. You can always create one yourself too.
That’s it for the Settings Menu. Next up let’s go to Appearance.
Appearance
The Appearance settings let you modify your WordPress Theme. Each WordPress installation comes with a default theme. That theme is typically named after the year you installed WordPress. For example, when you install WordPress in the year 2020 you’ll get the Twenty Twenty theme as the default.

To use a theme other than the default, select Add New and search the WordPress theme directory using any filters to help narrow the results. Select the Install button to add it to the Themes page on your admin dashboard.
Another option is to search the internet for WordPress themes. You’ll find both free and paid themes out there. Download the theme from the internet and upload it to your blog using the Upload Theme button. Uploading a theme counts as installing it so these themes are also listed on the Themes page of your admin dashboard.
You’ll see buttons to Preview and Live Preview themes. Preview shows you what the theme would look like using placeholder content supplied by the developer. It’s shown on themes that are not yet installed on your blog. Live Preview is available on themes that you have installed. It let’s you see the content from your blog as it will be displayed were this theme activated.
You can have many different themes installed, but only one active at a time. To make a theme active, click Activate.
Customize
Lots of WordPress themes nowadays come with a helpful graphical sidebar. Click Customize under theme settings to get to it. Customization includes options to
- edit the color schema
- show/hide a sidebar on your site
- show/hide logo, title and tagline at the top of your site
- update the logo, title, tagline, and favicon
- create navigation menus
- create sidebar and footer widgets
- add additional CSS
You may have noticed the customize menu is just a convenient, more graphical way of editing the layout and appearance of your blog. You can update the same settings in other menus on the WordPress dashboard. In other words, there’s more than one way to edit the same setting. Select whichever one you’re most comfortable with.
Widgets
Most themes provide the ability to add widgets to the sidebar and footer. Some themes have more than one footer or sidebar area for widgets.
Widgets give you the ability to add features and functionality to your blog without having to code. Examples of widgets include:
- search bar
- calendars
- tag cloud
- recent posts
- meta (Login, RSS, & WordPress.org links)
- custom HTML
Plugins sometimes come with widgets that will be added to the available list of widgets.
To activate a widget, drag it from the column on the left to the sidebar or footer area on the right where you want it to appear. To deactivate a widget, remove it from the sidebar or footer area. Once you’ve placed a widget in the sidebar or footer area you can customize it with specific settings.
For example, this theme comes with four footer area widgets. I placed a search bar in the left most widget. In the left-center widget I created Custom HTML and entered a link to my YouTube channel. To the right center I added a social icons widget which is an extension of a plugin. And in the right widget I put more Custom HTML this time with links to pages that didn’t make the cut for navigation menu at the top of the page.
Menus
Site Menus are a list of links that are usually displayed as the main navigation for your site. The menu location can vary depending on your theme, and additional menus can be created as well.
Typically, the menu setting has a default Navigation Menu, which you should update according to your site’s content. This is another drag and drop exercise to make it simple to create and modify the menu.
Select from Pages, Posts, Categories or even create custom links as part of your navigation menu.
Remember to Save Menu when you’re done.
Theme Editor
The theme editor provides access to all of the theme files installed on your site. This is like logging into your hosting account and editing the file. If there’s something that can’t be done with a plugin or widget (or maybe you don’t want to use plugins and widgets) you can edit the theme files to hard code that functionality. I don’t recommend using the theme editor unless you know what you’re doing.
Plugins
WordPress plugins provide a simple way for you as a blog owner to add functionality to your website. The WordPress Plugin Directory is a huge directory of all kinds of free and open source plugins.

Select Add New to search the Plugin Directory. Find the plugins that you need and select Install and Activate. Once a plugin is active you can manage its settings from the sidebar. Some plugins create their own links in the sidebar while others add links to the Tools menu or Settings menu.
Plugins under active development will often be updated by the developers. You’ll notice a plugin is ready to be updated on your blog when you see a notice in the dashboard, beside the plugins link in the sidebar or when viewing the list of installed plugins. You can update each plugin one by one or you can check all plugins and select Update from the dropdown list. This updates the plugins in sequential order. When updating plugins the frontend of your site does go down for maintenance.
The Plugin Editor lets you make direct edits to plugin files. Unless you really, really know what you’re doing then don’t make any changes here.
View my favorite plugins – Top 10 Essential WordPress Plugins
Pages
While pages are similar to posts in that they have a title, body text, and associated metadata, they are different in that they are not part of the chronological blog stream. They are kind of like permanent posts. Pages are not categorized or tagged, but can have a hierarchy.

The first few pages you’ll want to create are
- About
- Contact
- Privacy Policy
- Terms of Use
Select Add New to create a page.
Enter the page title. Permalinks will automatically create the url for you based on your permalink settings. You can always change the permalink if you want to. Be sure to verify the permalink after each page edit as it may automatically change.
Use the editor to create your page’s content complete with media, hyperlinks and styling.
There are a few boxes in the right sidebar. The publish box lets you preview the page, save it as a draft or publish it. You can also password protect or change the visibility to private, but neither of those are normally necessary. Another option is to schedule when to publish the page. This is more likely to be used with posts than pages, but the option is there.
Page Attributes
In the Page Attributes box you can nest pages under other pages by making one the “Parent” of the other, creating a group of pages. Select a template other than the Default Template to make your page appear differently than other pages. A new template will have to be created and modified prior to being able to select it in the page attributes box.
Pages are usually ordered alphabetically, but you can choose your own order by entering a number (1 for first, etc.) in this field.
Some themes include a featured image box in the right sidebar of the Page editor. The featured image will be displayed at the top of the page if you choose to include one.
Once you’ve published a page it will be available for selection in the Navigation Menu and Widgets to further build out your site.
Posts
Posts are the main content of your blog. In the default setup, posts appear in reverse chronological order on your blog’s home page. Posts can be categorized and tagged for better organization site wide. Think of posts as the content of a book. Categories are the table of contents whereas tags are the index.

To create a post select Posts > Add New
Enter a title for your post. After you enter a title, you’ll see the permalink below, which you can edit.
Enter the text for your post in the text editor. There are two modes of editing: Visual and Text. Choose the mode by clicking on the appropriate tab. Visual mode gives you an editor that is similar to a word processor. Click the Toolbar Toggle button to get a second row of controls.
The Text mode allows you to enter HTML along with your post text. Note that <p> and <br> tags are converted to line breaks when switching to the Text editor to make it less cluttered. When you type, a single line break can be used instead of typing <br>, and two line breaks instead of paragraph tags. The line breaks are converted back to tags automatically.
Insert media files by clicking the button above the post editor and following the directions. Align or edit images using the inline formatting toolbar available in Visual mode.
The Posts sidebar contains the same Publish box with the same functionality as a Page.
Post Categories and Post Tags
Unlike Pages, Posts have a sidebar box for Categories and one for Tags. Select a category(s) for your post and enter any relevant tags. If you don’t select a category, the default category of Uncategorized will be selected for you.
Notice that you can also edit categories and tags globally using the admin dashboard on the left. Do so by select Posts > Categories or Posts > Tags.
Some themes include a featured image box in the right sidebar of the Post editor. The featured image will be displayed at the top of the page if you choose to include one.
Once you’ve published a post it will be listed at the top of your Posts page as the most recent post. It will also be displayed in the Recent Posts widget.
Media
All the files you’ve uploaded are listed in the Media Library, with the most recent uploads listed first. Use the Screen Options tab to customize the display of the media page in the admin dashboard.

Narrow the list by file type/status or by date using the dropdown menus above the media table.
View your media in a simple visual grid or a list with columns. Switch between these views using the icons to the left above the media.
There are two ways to add new images, videos and other media to your site. One way is to select Media > Add New, where you can upload media to the Media Library for later use.
The other way is to edit a Page or Post. Place your cursor at the desired place and select the Add Media button above the editor. When media is added this way, for instance, it will be added to the Post or Page and to the Media Library.
Remember that the media settings are managed under the Settings > Media tab
Comments
Manage comments made on your site similar to the way you manage posts and other content. This screen is customizable in the same ways as other management screens, and you can act on comments using the on-hover action links or the Bulk Actions.
A red bar on the left means the comment is awaiting moderation.
In the Author column, in addition to the author’s name, email address, and blog URL, the commenter’s IP address is shown. Clicking on this link will show you all the comments made from this IP address.
In the Comment column, hovering over any comment gives you options to approve, reply (and approve), quick edit, edit, spam mark, or trash that comment.
In the In Response To column, there are three elements. The text is the name of the post that inspired the comment, and links to the post editor for that entry. The View Post link leads to that post on your live site. The small bubble with the number in it shows the number of approved comments that post has received. If there are pending comments, a red notification circle with the number of pending comments is displayed. Clicking the notification circle will filter the comments screen to show only pending comments on that post.
In the Submitted On column, the date and time the comment was left on your site appears. Clicking on the date/time link will take you to that comment on your live site.
Remember that the comment settings are managed under the Settings > Discussion tab
Users
This Users screen lists all the existing users for your site. Each user has one of five defined roles as set by the site admin: Site Administrator, Editor, Author, Contributor, or Subscriber.
Read more about user roles and capabilities on WordPress.org

To add a new user to your site, click the Add New button at the top of the screen or select Add New in the Users menu section.
Users with roles other than Administrator will see fewer options in the dashboard navigation when they are logged in, based on their role.
Remember that the Settings > General tab is where you check the membership box to allow people to register on your site and also where you set their default user role.
User Profiles
Each user has access to their User Profile where they can edit their name, display name, email and add links to their social media accounts. Users can add a few sentences describing themselves. They can change their Avatar and their password. Usernames cannot be changed.
Tools
Tools provides different options to manage your site.

Import
Import posts or comments from another blogging system:
- Blogger
- LiveJournal
- Moveable Type and TypePad
- RSS
- Tumblr
- WordPress
Export
Exporting creates an XML file to save to your computer. Export all of your posts, pages, comments, custom fields, terms, navigation menus, and custom posts or select from a subset of those.
How To Build A Blog: Summary
Thank you for reading this guide on how to build a blog. I hope you agree that it can be easy to do once you have the right steps to follow.
Bookmark this page to come back to as you build more WordPress sites. I will be updating this page frequently with new information and resources as required so that you always have the latest guide to review.
Are you ready? Start a blog today with A2Hosting for only $2.99/mo (66% off your hosting plan)