
Ready to learn how to start a blog and make real money online? This guide is for you.
Get up and running in no time by following these 10 simple steps to starting a blog in 2020. But first, why should you read this particular guide? Why do we need yet another guide on how to start a blog?
This guide covers how to start a blog (more than just marketing)
Launching a blog is more involved than just using some SEO and marketing tricks to attract new users.
Yes, I’ll show you all of the tactics to get your blog off the ground quickly and how to attract new visitors in the early months, but I’ll also take you a few steps further to show you how to modify your website’s code so that you can make your site work exactly the way you want it to.
I’ve been developing web applications since the early 2000’s. Many of my successful sites over the years have been built on top of WordPress. The great thing about WordPress is that it’s first and foremost a Content Management System (CMS). It’s most popularly used for blogging, but with all that power under the hood you can easily modify it to create all kinds of powerful websites.
I can help you start a blog the right way. I’ve built many conventional WordPress blogs and I’ve also created a lot of unconventional web applications using the WordPress software.
Whichever type of website you need, I want to help you make it work exactly the way you want it to. That takes more than a few SEO and marketing tweaks.
And that’s why I create these different guides to help you. To give you the web development skills in addition to the marketing skills needed to start and grow your blog.
Creating a money making website doesn’t have to take forever
We can make your blog profitable in a matter of months by implementing the right strategy. A lot of that has to do with marketing.
I’ll show you how to do all of that so you can start a blog and grow it from month number one. We’re going to start focusing on growth and scalability before your article count even hits double digits.
It’s important to start seeing early success in the way of site visitor growth. It’s also a great motivator to keep you engaged and help you maintain focus so you continue building your site without losing steam and changing ideas.
Follow the guide for tried and true methods.
WordPress makes starting a blog easy
In addition to marketing, another important thing to think about is web development.
WordPress makes this fairly easy with themes and plugins that you simply select and activate.
You will soon find that these one size fits all solutions may not behave exactly how you were expecting on your site. A slight modification here or there can make it respond exactly how you want it to.
Knowing how to modify the code is a huge skill to have as a web entrepreneur. Along with showing you how to market your blog I’ll also show you all the in-depth web development tips and tricks to make the code on your site function the way you want it to.
Disclaimer: Keep in mind that this post includes affiliate links where I receive a commission at no cost to you when you click and make purchases. However, the links I post are for the best software and services you need to start and maintain a blog. I do my best to keep things fair and balanced in order to help you make the best choice for your situation.
So what’s in the “how to start a blog” beginner’s guide?
This guide will show you how to choose a niche for you blog, research and register a domain name, get a web hosting account, install WordPress with a theme and essential plugins, and start creating your foundational content.
How To Start A Blog in 10 Easy Steps
- Finding your blog’s niche
- Research a domain name (and social media names)
- Select a web hosting provider
- Install WordPress
- Select a responsive theme
- Install essential plugins
- Create an outline of your site and the navigation menu (categories vs tags)
- Create pillar articles
- Update SEO, meta tags and keywords
- Continue creating content with helpful resources
1. How To Find A Niche For Your Blog
The first step when you start a blog is to get a hosting account. I recommend using A2Hosting. Use my link and get started for just $2.99/month (66% off your hosting plan).
What is a niche market?
A niche by definition is a specialized market.
A market simply brings together buyers and sellers.
To avoid any confusion, you are in search of a niche market not a niche product.
The blog you create will host one or many products serving that niche market. They can be digital or physical products. They can be products that you create or that you resell. We’ll get into that later.
The reason you want to find a niche market for you blog is twofold.
First off, you want to get your initial product to market as soon as possible to determine it’s viability. There’s no sense wasting time and money on something that’s just not going to pan out.
Why you need to focus on a niche market?
Second, a niche market allows you to focus on a specific audience.
In my experience, focusing on a specific audience and giving them your full attention is the only way to create successful online products.
There are going to be a million thoughts and product ideas running through your mind as you create your website, which is great. Write them down and revisit them later. You may be able to incorporate them in your site’s roadmap, which we’ll cover later in this guide.
For now, focus on finding the specialized market when you start a blog.
Finding your niche market
Escaping the rat race, becoming financially free, having more time to do the things you want are all motivators that drive us online entrepreneurs.
For your own sanity it’s important to have an interest (a passion) in the market you’re about to participate in. Otherwise, you’re simply replacing a job that you don’t like as an employee with a job you’re won’t like as a blog owner.
Steer clear of that trap by creating a blog that represents your interests.
Your interest level in the subject will be evident early on and either make or break the interest of the audience reading your posts.
I’ve spent more time than I care to think about researching different markets over the past 15 years. What I discovered along the way is that no matter what market you decide to enter it’s going to require work.
Yeah, but what about the old saying “If you love what you do, you’ll never work a day in your life”? I don’t think that’s exactly accurate. There’s always some part of the job that’s going to be tedious.
When you’re just starting up you can’t outsource or delegate much. I think I would rephrase it to say “if you have to work on something you might as well work on something you really enjoy” because there’s always going to be work involved.
So when you start a blog, what do you want to work on?
Let’s run your best ideas through a few filters to see which are worth pursuing.
How To Start A Blog Filter #1: You Must Produce
We’ve established that it’s a good idea to have your niche blog be representative of your interests and passions.
Some people struggle to identify an interest that’s good enough to create a blog around. Let’s do a discovery exercise to test yours.
One good method of finding your interests is to think about and keep track of the things that you enjoy doing daily. Most of the time these are the activities you would do even if you weren’t getting paid, but you might as well track the enjoyable parts of your job too. It’s not all bad, is it?
Once you make a mental note of the things you enjoy doing and before your idea makes it to your written list, you need to apply what I like to call the production versus consumption filter.
Production versus Consumption
Is the activity that you just engaged in something that you’re consuming or something that you’re producing? If it’s productive than write it down. If it’s consumptive than it doesn’t make the written list.
Consumptive behavior only provides value to yourself as a consumer. Productive behavior provides value to others as consumers. To create a profitable blog you must create value for others.
Maybe you enjoy watching a certain TV show. It shouldn’t make the list because watching TV is a consumptive behavior benefiting only yourself.
You might enjoy reading the news. Again it’s not an activity that makes the list because it’s consumptive.
What you do with the information might be productive. If you scour news sources and provide a summarized RSS feed to make it easier for people who have limited time, well that’s productive and provides value to others.
If you stop short and just scour the news, that’s consumptive. I’m not saying it’s bad. There’s simply no value in consumption other than to the consumer. When you produce things, like a blog, you create value for other consumers.
We Are Creative Beings
So what do you like to create?
If you’re like me you really enjoy creating things with technology, i.e. web applications, chatbots, algo bots, artificial intelligence, etc.
The types of activities where you are creating and producing something are the ones that make the list. It can be planting an herbal garden, tracking stocks on a spreadsheet or even DIY engine repair videos. Those things are productive activities and should make your written list of interests.
How To Start A Blog Filter #2 – Can it be monetized?
Once you have your written list of productive interests you’ll apply a second filter to determine whether the activity is a good candidate to be monetized via a blog or not. Before we get into that let’s first address the different types of niche blogs. There are essentially three types.
Three Types of Niche Blogs
Informational – your blog is a resource for your audience to obtain knowledge. Good informational blogs fill the gaps in knowledge to empower their audience to take more confident action.
Community – your blog is a place for people with common interests to meet online. You can form communities around topics, interests and even people.
e-Commerce – your blog is the marketplace where consumers come to purchase products. They can be your products, products you’re reselling or a combination of the two.
Ways To Monetize A Blog
There’s about five different ways in general to monetize a blog.
Ads – Text and image advertisements placed within the articles or sidebar of your site or in your newsletter. Examples include AdSense, sponsored banner ads and email marketing.
Affiliate – You’re a reseller of other products and services. You draw visitors to your site with an interest in your niche market and provide links to products and services they may be interested in. If they click the link and purchase something, you get a portion of the sale.
Directly Selling Products – These are products that you create like e-books or courses and sell directly from your site. Usually these are downloads or a one time charge for access to content. If you’re selling someone else’s products then it falls under affiliate marketing.
Subscription – Access to content is sold via a recurring payment. That access might be for premium content, early visibility to content or even access to you the blogger to ask questions.
Services – Selling services online via your blog tends to get away from the ultimate goal of passive income. If the service you’re selling isn’t yours then it’s affiliate marketing again. Trading time for money is not something I’m a big fan of, but I’ll include services as the last type of blog monetization for completeness.
Match Blog Type With Monetization
Now it’s just a matching game.
When starting a blog, think about what type of blog would best suit the needs of your niche market audience and also where you can provide expertise.
Is it informational, community, e-commerce or a combination of the three? It’s best to start with one and grow as your user base grows.
Next, what’s your high level plan to monetize the site? Do you think you will you be creating and selling your own content (direct sales) or reselling others content (affiliate marketing)? Will you be offering access to your content as a one time fee (direct sales) or an ongoing monthly fee (subscription)? You don’t have to figure it all out right now.
Blogs can and should change over time. It’s just good to start thinking about monetizing your site at this point. The more monetization methods you can include the better.
It’s always a balance though. Always be thinking about the user experience too. I had to remove automated placement ads altogether on one of my sites because they were interfering with the readability and users started complaining.
Scalability goes hand in hand with monetization. If your site can be monetized easily then it can usually be scaled easily too. When you think about different ways to monetize your site also think about ways to scale your site both horizontally and vertically. If you find it difficult to monetize and scale your niche idea then it might be time to drop the idea and start the process over again with another idea that made the written list.
Ready to get going? Use my link and get started for just $2.99/month (66% off your hosting plan).
How To Start A Blog Filter #3 -What’s the competition look like?
At this point you’ve figured out your niche market and have one or more ways in mind to monetize your site.
Now it’s time to check the competitiveness of your niche market. We want to know how popular the keywords are that will be used with your blog. This tells us the potential customer base.
We also want to know how many other websites are out there competing for this space. This is your competition. The higher the ratio between customer and competition the better.
Lastly, we’ll look at suggested bid price, which tells us how much it might cost to serve our own ad for a particular keyword or phrase. It’s a pay to play way to be competitive for keywords when your site isn’t yet the top search result. Another way to interpret bid price is customer acquisition cost. How much does it cost me to attain a customer?
Keyword Planner
You’ll need to setup a Google AdSense account to use these free webmaster tools. Then head over to Google Keyword Planner to start researching keywords.
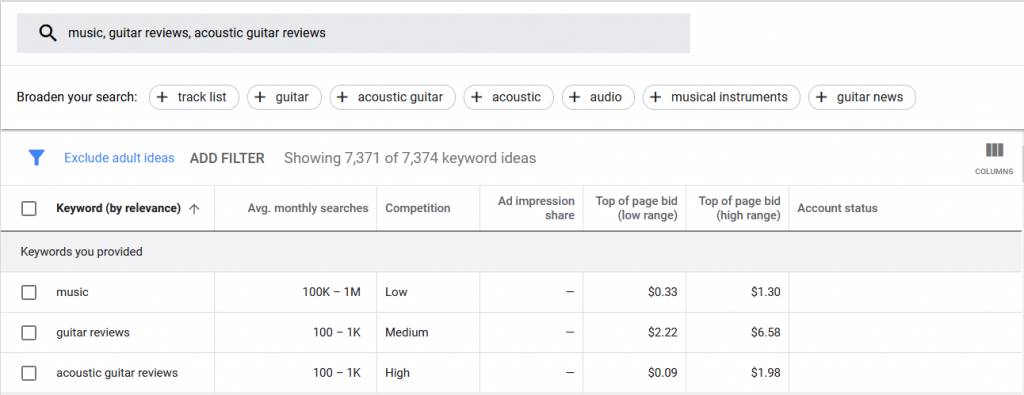
This is a screenshot of a search I ran for three different keywords: music, guitar reviews and acoustic guitar reviews. We can see mixed results.
There are a lot of monthly searches for the keyword “music” while the competition and bid prices are low. That’s most likely because it’s such a generic keyword.
How many people searching for music are searching because they want to find an acoustic guitar review blog?
The keywords “guitar reviews” and “acoustic guitar reviews” have about the same amount of monthly searches, but there’s less competition for “guitar reviews”. It will cost you more to place an ad with the keyword “guitar reviews” though.
On your acoustic guitar review blog you might consider using the keyword “guitar reviews” instead of “acoustic guitar reviews”. And when you want to purchase AdSense ads you might consider doing the same if it’s within your budget.
Finding your niche is a huge step. It’s really important to do the work up front because everything else hinges on this decision. Now that you’ve found your niche, let’s build your site!
2. How To Research And Register A Domain Name
You can spend a lot of time researching a domain name to get just the right one.
Don’t worry too much about that one perfect domain name that explicitly summarizes your website’s purpose in a short, catchy name. If you follow these well known guidelines to get a good domain name you’ll be off to a great start. After all, the domain name is what you make of it.
Apple.com isn’t a fruit company.
Amazon.com isn’t about a rainforest.
And Bing.com has nothing to do with the sound of a bell.
Domain Name Recommendations
Do your best to follow these guidelines, but don’t sweat it too much.
1. Keep it short. Most one word .com domain names are taken. Therefore, try to keep it to 2-3 words.
2. Keep it simple. Make it easy to spell and remember. No dashes or other special characters.
3. Keep it relevant. Using keywords in the domain name helps people recognize your site and helps with search engine optimization too.
4. Things to avoid. Numbers, dashes, misspellings, brand names and trademarks in your domain name.
Researching A Domain Name
I like to use two sites when researching domain names.
DomainTyper.com – This site runs an ajax powered search, which means it runs a search after every letter you type into the search box. It really saves a lot of time when searching for domain names. You can also add other top level extensions that interest you.
NameCheckr.com – This site runs a search against a number of social media platforms to see if your domain name is also available as a username. If possible, register those usernames as soon as you reserve your domain name!
Registering A Domain Name
Once you’ve found a great domain name and are ready to start a blog, head over to A2Hosting.com to register your name. A2Hosting is a one stop shop for domain names and very inexpensive hosting account plans. They also have some of the best customer service you’ll find in a provider (I know because I’ve been a customer since 2005).
Ready to start a blog with A2Hosting? Get going for just $2.99/month (66% off your hosting plan) with my link below:
3. How To Select A Web Hosting Provider
A web hosting provider is a company that offers a service where they run and maintain the servers that serve your st your website’s files. Different web hosting options are available from the providers. Many hosting providers use similar names for these services.
Types of web hosting servers
Shared Server Hosting – typically the cheapest. You have an account on a server, but so do a lot of other customers. Your accounts are logically kept separate so you can only access your files and databases. You do not have root access to the server so any changes at that level will need to be handled by a support ticket.
WordPress Hosting – A shared hosting server where the provider has already installed WordPress for you. The managed WordPress hosting option means the provider will fully maintain the WordPress installation for you and you simply write your pages and posts.
Virtual Private Server (VPS) Hosting – A physical server is carved up into multiple different virtual machines. Your account gives you root access to your virtual machine so you can make any changes you need to.
Reseller Hosting – The hosting provider offers you a white label solution so you can resell hosting services. The provider maintains the physical and virtual servers underlying the reseller services and you manage and maintain your own hosting customers.
Dedicated Server Hosting – usually the most expensive. The entire server is yours to do with what you want. You can submit a support ticket when you lock yourself out. With great power comes great responsibility!
All of the options come with cPanel, a graphical interface for managing your web files.
If you’re just starting out I would recommend the Shared hosting plan.
There are a few different tiers within the Shared hosting option. You can always upgrade to the next tier with hardly any interruption to your site’s uptime.
To get started with A2Hosting for just $2.99/month (and get 66% off your hosting plan), use my link below:
4. How To Install WordPress
With A2Hosting, you can install WordPress and start a blog in a matter of minutes.
WordPress is a free and open-source Content Management System (CMS) written in PHP and paired with a MySQL (or MariaDB) database. It’s architecture supports plugins, which are used to add different features to the site and themes, which are used to style the website.
How To Start A Blog: One-Click Automatic WordPress Installation
Once you login to the cPanel dashboard for your website, scroll down to the Softaculous Apps section. Select the link for WordPress – A2 Optimized.

A2 Optimized for WordPress includes these features.
- Page caching
- Database caching
- CSS/JS/HTML minification
- reCAPTCHA on comment and login forms
- Move the login page
- Image compression
- Compress pages with gzip
Select Quick Install. All you need to do is select the domain name for the WordPress installation and accept or change the username/password. You can always change these later too. The WordPress files and database will be installed automatically.

To manage your WordPress site after automatic installation, browse to yourdomain.com/wp-admin
Use the username/password you set in the last step to login as an administrator to your blog.
How To Start A Blog – Manually installing WordPress
Manually installing WordPress is slightly more involved than the quick installation method. These are the high level steps involved for the more tech-savvy do it yourselfers.
- Download the latest version of WordPress (from WordPress.org not WordPress.com!)
- Login to your A2Hosting cPanel account and uUpload and unzip files to your domain folder
- Create a MySql database and add a user with permissions to Create, Delete, Select, Insert and Update
- Browse to your domain name and run through the installation process. In the process you’ll create a new username/password for you WordPress admin user and you’ll need the credentials for the database user to have the installation process work properly.
After the installation completes you should be able to browse to your domain name and see the default WordPress theme.
Next we’ll customize your site’s theme to make it look like you want it to.
Ready to launch your blog? Get started for just $2.99/month (66% off your hosting plan) with my link below:
5. How To Select And Install A Responsive Theme
WordPress comes with a default theme. Starting in 2010 a new theme was released yearly. The default theme gets updated to include the latest HTML5 and CSS best practices and a slightly different look than the previous year.
You can tell the default WordPress themes because they’re named after the year they were released such as this year’s Twenty Twenty.
Mobile support has been part of the default themes since Twenty Twelve. It’s been ever improving over the years and able to support the myriad of devices and screen sizes that may be accessing your site.
If you decide to use a different theme I would highly suggest making sure it is responsive.
Responsive web design is about creating web pages that look good on all devices.
A responsive website automatically adjusts for different screen sizes and viewports.
Where do you find WordPress themes?
From the admin panel of your WordPress blog you can select Appearance > Themes > Add New to search the officialy WordPress.org theme repository. Theme developers submit their themes to this repository, which is used by millions of WordPress users all over the world.
Use the Feature Filter to narrow down the list of available themes. Enter the search term responsive to see the official themes that are purposely built to resize depending on the screen size.
You can also search for themes on the internet. They range from free to freemium to paid versions. If one of these themes is what you’re after simply download it from the internet and upload it to your themes directory using the admin panel of your WordPress blog.
Once it’s uploaded it will appear in your list of installed themes where you can Preview it live and make it active by clicking Activate.
Once activated, most themes provide a Customize button when you hover over them in the admin panel.
For a freshly installed theme you’ll want to start by customizing the following:
- Site Identity – including the Site Title, Site Description and Site Icon
- Widgets – adding HTML, text, links, etc to your sites sidebar and footer
- Pages – defining which page is your home page and which page displays your blog posts
Ready to start a blog and follow along with this guide? Get started for $2.99/month and get 66% off your blog hosting plan:
6. How To Install Essential WordPress Plugins
WordPress plugins provide a simple way for you as a blog owner to add functionality to your website. The WordPress Plugin Directory is a huge directory of all kinds of free and open source plugins.
Developers create plugins and add them to the Plugin Directory. You can search the Plugin Directory right from the admin panel of your blog. Just click Plugins in the sidebar and select Add New. Search by keyword to find the plugin that you need and select Install Now.
Once the plugin is active you can manage its settings from the sidebar. Some plugins create their own link in the sidebar while others add links to the Tools menu or Settings menu.
While each WordPress site is different I do find myself installing some of the same plugins on just about every site I create. Here is a list of 10 essential plugins that I use on my WordPress sites (including this site, TrailSix.com).
10 essential WordPress Plugins
Classic Editor – In WordPress 5.0, the classic content editor was replaced with a brand new block editor, known as Gutenberg. Call me old fashioned, but I prefer the classic editor. Classic Editor is an official plugin maintained by the WordPress team that restores the previous (pre-Gutenberg) WordPress editor and the “Edit Post” screen. It will be fully supported until at least 2022.
Constant Contact Forms – makes it fast and easy to capture visitor information right from your WordPress site. Whether you’re looking to collect email addresses, contact info, or visitor feedback, you can customize your forms with data fields that work best for you. Best of all, this plugin is available to all WordPress users, even if you don’t have a Constant Contact account.
BONUS: If you have a Constant Contact account, all new email addresses that you capture will be automatically added to the Constant Contact email lists of your choosing. Not a Constant Contact customer? Sign up for a Free Trial!
GDPR Cookie Consent – The GDPR Cookie Consent plugin helps you make your website GDPR compliant. It comes with a host of features including options for displaying and hiding the consent form. For example, I like to have the cookie tab completely disappear after a user accepts.
AMP – The AMP Project is an open-source initiative aiming to make the web better for all. AMP enables web experiences that are consistently fast, beautiful and high-performing across distribution platforms. AMP formerly stood for “Accelerated Mobile Pages”, but now works completely across desktop and mobile. The official AMP plugin for WordPress supports fully integrated AMP publishing for WordPress sites, with robust capabilities and granular publisher controls.
Last Modified Info – Most WordPress themes usually show the date when a post was last published. This is fine for static websites. However, WordPress is also used by websites where articles are regularly updated like on this site, TrailSix. The last updated date and time is important information so users don’t miss out on updates.
Lightweight Social Icons – Lightweight Social Icons is an easy to use social icon widget which lets you display your favorite social profile icons. You can modify the font, size, border radius (roundess), color and hover color of your icons.
List Category Posts – List Category Posts allows you to list posts by category in a post or page using a shortcode. When you’re editing a page or post, directly insert the shortcode in your text and the posts will be listed there. This is a nice way to more dynamically filter which posts in a category get displayed on a page.
Reveal IDs – Since WordPress 2.5, the IDs on all admin pages (users, posts, pages, categories) have been removed. This plugin displays those entry IDs as it was in versions prior to 2.5. This is really helpful with other plugins like List Category Posts that take IDs as an input to their shortcode.
WPBruiser – The antispam and security plugin that really works. You no longer need CAPTCHA, but still get protection against spam bot signups and comments. Select what to protect from a long list of options including register/login/forgot password forms, comments, whitelist/blacklist IPs, user enumeration, etc.
Yoast SEO – This is one of the most important plugins you can install. Yoast SEO significantly helps to improve your search engine optimization on every single post and page. It creates a sitemap and other things too. Yoast SEO is the favorite WordPress SEO plugin of millions of users worldwide for a good reason. It does the job
7. How To Plan Your Site Content And Build A Navigation Menu
At this point you have a fully functioning WordPress installation and you’re ready to create your Pages, Posts and Navigation Menu.
That means we need to start focusing on the particulars of your blog. Why does it exist? Who is it for? How will it make money?
We’re going to build a customized content strategy for your particular blog.
If you don’t have a business plan yet that’s ok. I suggest creating at least a one-page business plan to capture the high level goals of your blog. If you plan to make money with the blog (and you should be!) then approach it as a serious business not as a hobby.
The one page business plan
A one page business plan answers the following bullets with one or two quick sentences:
- PROBLEM/SOLUTION
- Problem. List the top 1-3 problems
- Existing Alternatives. List how these problems are solved today
- Solution. Outline a possible solution for each problem
- THE BUSINESS
- Key Metrics. List the key numbers that tell you how your business is doing
- Unique Value Proposition. Single, clear, compelling message stating why you are different and worth paying attention to. The elevator pitch.
- High Level Concept. List your X for Y analogy (e.g. YouTube = Flickr for videos)
- Unfair Advantage. Something that can’t be easily bought or copied
- THE CUSTOMER
- Customer Segments. List your target customers and users
- Channels. List your path to customers (inbound or outbound)
- Early Adopters. List the characteristics of your ideal customer
- REVENUE
- Cost Structure. List your fixed and variable costs
- Revenue Streams. List your sources of revenue
Your content strategy is a plan to deliver information via your blog in the form of articles, videos, digital downloads, etc.
The purpose of the content you post is to get your target market from point A (problem) to point B (solution).
Even if your product is insanely awesome, people will inherently want to establish trust in you and your brand before becoming a paying customer. This is why you need an About page and a Contact page on your blog. These pages describe the businesses unique value and unfair advantage, which are trust factors that your target market (i.e. potential customers) will be looking for.
In addition to those pages you’ll need a page each for Privacy Policy, Terms of Use and your Cookie Policy, which can be created by the GDPR plugin.
WordPress terminology
A Post is an entry listed in reverse chronological order. You create Posts to share new content with your readers. Posts can be assigned to one or more Categories and Tags.
A Page is static and is not affected by the date. Home, About and Contact are usually created as Pages.
Categories and Tags help you organize your site. Think of categories as the table of contents of a book and tags as the index.
Organize Your Site Content
So you know what your blog is going to do because you’re thinking about it like a business and you have at least a one page business plan. You also understand how to start a blog with WordPress and how it should be structured now too. All you have to do is organize those ideas as if you’re writing a book.
As an example, this might be my elevator pitch followed by how the business model translates into different pages that become part of the navigation menu on my website.
TrailSix is a technology company that creates informational guides, how to articles/videos, software reviews and custom digital products all to help people start and grow their online business.
Along with the standard pages there are four more pages that I created to fit the TrailSix business goals nicely:
Tutorials – this page lists all of my “How To” blog posts. I created a Tutorials category so I can easily use the List Category Posts plugin to filter for and display only those posts.
Software Reviews – this page lists all of my “Software Review” blog posts. I created a Software Review category and use the List Category Posts plugin again.
Startup Essentials – this page displays all of the software that I stand behind. Some of the software listed I link to with affiliate links. Other software is what I built in-house to help budding entrepreneurs.
Blog – Not every article I write is a Tutorial or Software Review so I created a page to show all of my posts. Hence the generic blog page.
Creating Pages and The Navigation Menu
Now that we know what the primary pages are we need to create a page for each of them and update the main navigation menu to point to them.
To create a Page
Select Pages > Add New from the sidebar.
Add the Title and click Publish.
You can enter the content later. We just need to publish the page so it displays as an option when building the navigation menu.
To create the Navigation Menu
Select Appearance > Menus from the sidebar.
Create a new menu or edit the Navigation Menu if it already exists.
Check the box next to the pages you want to add to the menu and select Add to Menu.
Under Menu Settings make sure the box is checked for Navigation Menu.
It’s as easy as that. Save the menu and visit your homepage to see the changes.
8. What Are Pillar Articles And How To Create Them
Pillar articles are the first articles you write when you start a blog. A pillar article, also called evergreen content, is a page that offers great value to your readers, defines your blog, stands the test of time, is usually longer than most posts and it brings readers back time and time again.
You’re reading a pillar article right now. And if you’ve made it this far, congratulations! This entire article is a long read.
What are pillar articles?
Pillar articles drive traffic to your blog (like this one on how to start a blog)
They keep people on your blog longer, which reduces bounce rate.
They are a resource that people can bookmark to refer back to time and again because the content is timeless.
Plus, they’re memorable. You could search the internet for each of topic in this guide when you’re ready to cross that bridge, but once you find this page then all you have to do is remember (bookmark) that TrailSix has a complete guide to starting an online blog and then revisit this page. It simplifies the process, adds value to you the end user and provides brand recognition for TrailSix.
Creating pillar articles
I recommend you start with a minimum of four pillar articles for your blog. They’ll act as umbrella topics to which you can create many different interlinked posts. The purpose of the interlinked posts is to dive deeper into a topic that’s explored at a higher level on the pillar articles.
Having a pillar articles and its interlinked posts share keywords really helps with SEO. Killer content rules!
Search engines have more opportunity to find your blog this way. Nowadays, instead of searching for single keywords (blog), people are trending towards using short phrases (how to start a blog). With the introduction of voice user interfaces it will be interesting to see how this trend becomes even stronger.
It’s safe to say that search phrases won’t be shortening any time soon so having pillar articles with interlinked posts is a great strategy for your blog to improve in the search engine rankings.
9. How To Search Engine Optimize (SEO) Your Website
The top five U.S. search engines based on Alexa ranking are Google, Yahoo!, Bing, Ask.com and DuckDuckGo.
The goal when search engine optimizing your blog is to publish articles that are valuable to your readers and rich with relevant keywords. While single articles may focus on a specific keyword or phrase, a handful of articles should be used together to provide high quality content that naturally targets terms that people regularly search for in your niche market.
This should be done on your pillar articles and on all supporting posts.
The best plugin I’ve found that has proven to improve my search engine rankings is Yoast SEO.
With the plugin installed, let’s say you have just finished drafting an article and are ready to work on search optimization.
Yoast adds two attributes, Readability and SEO, to the sidebar in the Publish box. They display the results of the algorithm’s analysis of your post.
Readability
As you can see here, my SEO is OK, but the readability needs improvement.

There are three readability scores: Needs Improvement, OK and Good
There are five SEO scores: Needs Improvement, OK, Good, No Focus Keyphrase, Post Noindexed
To improve the readability, scroll to the Yoast box when editing the article and click the Readability tab. It tells you exactly where to make improvements. Edit your text accordingly until you’re happy with the readability analysis.

SEO – Search Engine Optimization
SEO is important when you start a blog and throughout the life of your website.
Next, select the SEO tab. On this tab you can set your single most important focus keyword (or phrase). You can add a custom meta description, which will be displayed in search results.
You can view the SEO analysis and fix any problems that the plugin has identified.
Then you can mark your pillar articles as cornerstone content.

Social
The last step is to use the Social tab to add social data for your article. This tells social media sites what to display when the page is shared.
Of course, there are other SEO tricks to improve your search engine rankings and I’ll cover those in a separate article soon. For now, if you start with the Yoast SEO plugin you’ll be ahead of the game.
10. Continue creating content with helpful resources
As you continue creating your pillar articles, supporting articles and interlinking them, you’ll probably find yourself searching for some web design help. Here are a few of the resources that I commonly leverage as I create articles.
clrs.cc – a color palette of 16 default colors that are nice for prototyping
FontAwesome – free icons that are, well, awesome
Google Fonts – free online font service hosted by Google
Pexels.com – free stock photos that can be downloaded in any size you need
How To Start A Blog: Summary
First of all, thank you for reading this guide on how to start a blog. I hope you agree that it can be easy to do.
You can make money online with your blog if you’re willing to put in the hard work to create valuable content for your niche market and update your posts for maximum search engine optimization and user readability.
I have gone through all the steps needed to start your own blog. I will be updating this page frequently with new information and resources as required so that you always have the latest guide to review.
Are you ready? Start a blog today with A2Hosting for only $2.99/mo (66% off your hosting plan)
Next up: How To Grow Your Blog